Introduction
Zygomatic fractures, commonly referred to as cheekbone fractures, are among the most frequent facial injuries encountered in maxillofacial trauma. Because the zygomatic bone plays a critical role in facial symmetry, ocular protection, mastication, and overall aesthetics, accurate and timely reduction is essential. One of the most widely accepted and time-tested techniques for managing displaced zygomatic fractures is the Gillies temporal approach, performed using a Gillies-type malar elevator.
Despite advances in open reduction and internal fixation, the Gillies technique remains highly relevant due to its simplicity, minimal invasiveness, reduced scarring, and effectiveness in appropriately selected cases. This article provides a comprehensive, step-by-step guide to using a Gillies-type malar elevator in zygomatic fracture reduction, covering anatomy, indications, preparation, surgical technique, postoperative care, complications, and clinical pearls. The goal is to serve as a practical reference for trainees and clinicians involved in facial trauma management.
Understanding Zygomatic Fractures
The zygomatic bone forms the prominence of the cheek and contributes to the orbit, maxilla, and temporal bone. It articulates at four key sutures:
- Zygomaticofrontal
- Zygomaticomaxillary
- Zygomaticotemporal
- Zygomaticosphenoid (within the orbit)
Fractures of the zygoma commonly result from road traffic accidents, interpersonal violence, sports injuries, or falls. These injuries may present as:
- Isolated zygomatic arch fractures
- Zygomaticomaxillary complex (ZMC) fractures
- Comminuted or displaced fractures
Clinically, patients may show facial asymmetry, flattening of the cheek, trismus due to impingement on the coronoid process, infraorbital nerve paresthesia, diplopia, or enophthalmos. When displacement is present without significant comminution, closed reduction using the Gillies approach is often an ideal option.
Overview of the Gillies Technique
Sir Harold Gillies first described the Gillies approach, which has been used for decades as a minimally invasive method to elevate depressed zygomatic fractures. The technique involves accessing the zygomatic arch via a small temporal incision and using an elevator to reposition the fractured bone.
The key advantages of this approach include:
- No visible facial scar
- Minimal soft tissue dissection
- Reduced operative time
- Preservation of periosteal blood supply
The Gillies type malar elevator is specifically designed to facilitate controlled elevation of the zygomatic arch and body through this temporal access.
Gillies Type Malar Elevator: Design and Function
The Gillies type malar elevator is a curved, blunt-ended instrument designed to slide beneath the zygomatic arch or malar eminence. Its shape allows it to conform to the contour of the zygoma while minimising the risk of penetrating soft tissues or damaging underlying structures.
Key features include:
- A gently curved shaft for anatomical access
- A broad, smooth tip to distribute force evenly
- Adequate length to reach the fracture site from the temporal incision
Compared to other elevators, the Gillies elevator provides better leverage and control during elevation, making it particularly effective for depressed zygomatic fractures.
Indications for Using a Gillies Type Malar Elevator
The Gillies technique using a malar elevator is indicated in:
- Isolated zygomatic arch fractures
- Minimally comminuted ZMC fractures
- Depressed fractures causing facial asymmetry or trismus
- Cases where rigid fixation is not immediately necessary
Ideal candidates are those presenting early after injury, before fibrous union occurs. The technique is especially useful in resource-limited settings or when cosmetic considerations favour a closed approach.
Contraindications and Precautions
While effective, the Gillies approach is not suitable for all cases. Contraindications include:
- Severely comminuted fractures
- Late-presenting fractures with established fibrosis
- Fractures requiring orbital floor reconstruction
- Unstable fractures needing rigid fixation
Care must be taken in patients with previous temporal surgery or scarring, as anatomical planes may be distorted. A thorough risk-benefit assessment is essential before selecting this technique.
Preoperative Assessment and Planning
Preoperative evaluation begins with a detailed clinical examination focusing on:
- Facial symmetry
- Palpation of the zygomatic arch
- Mouth opening and occlusion
- Sensory deficits in the infraorbital nerve distribution
- Ocular movement and vision
Radiological assessment is crucial. Standard imaging includes:
- CT scan of the facial bones (axial and coronal views)
- 3D reconstructions for surgical planning
Imaging helps confirm displacement, fracture pattern, and suitability for closed reduction. Proper planning ensures efficient execution and reduces intraoperative complications.
Instruments and Operating Room Setup
Essential instruments include:
- Gillies type malar elevator
- Scalpel with No. 15 blade
- Hemostats
- Periosteal elevator
- Retractors
- Sutures for skin closure
The patient is positioned supine with the head turned slightly to the opposite side. Strict aseptic precautions are followed, and the temporal region is shaved if necessary to improve access and visualisation.
Anaesthesia and Patient Positioning
The procedure can be performed under:
- General anaesthesia (preferred)
- Local anaesthesia with sedation in selected cases
General anaesthesia allows better muscle relaxation and patient comfort. The head is elevated slightly to reduce venous congestion. Proper positioning ensures a clear surgical field and facilitates controlled manipulation during fracture reduction.
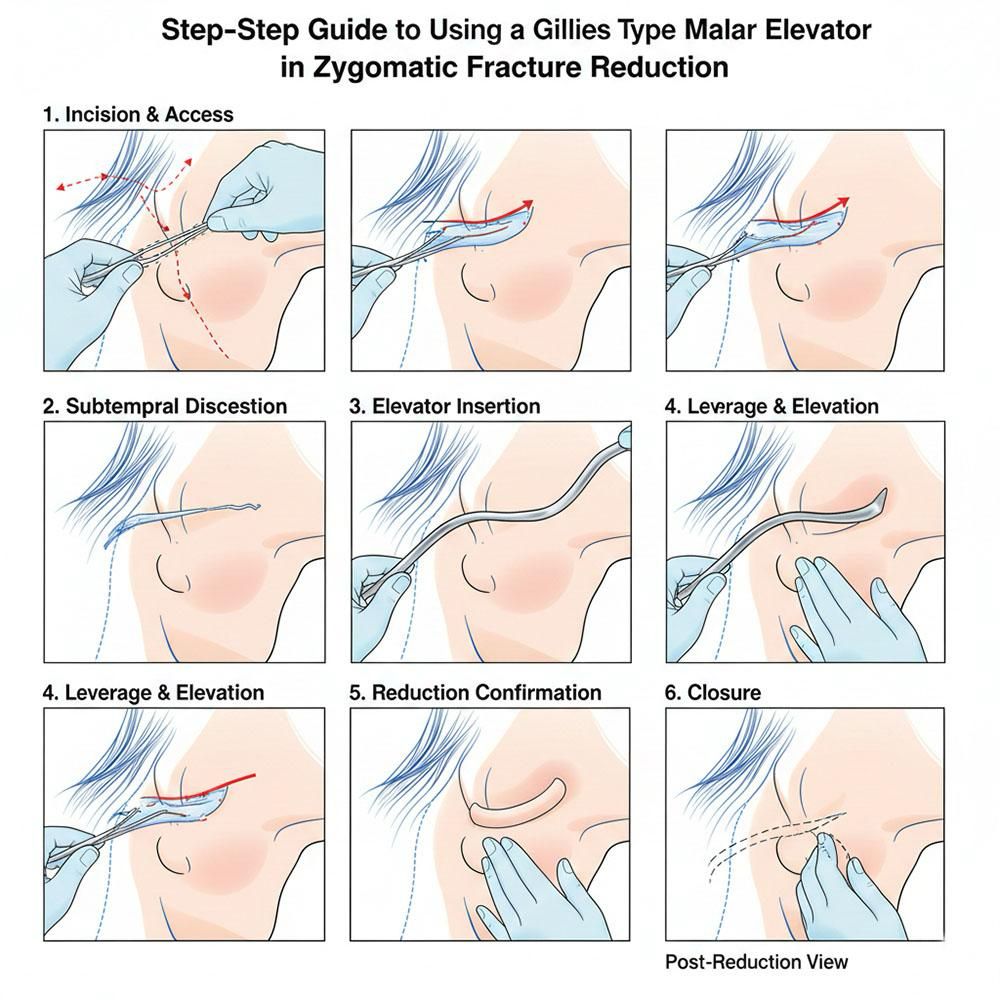
Step-by-Step Surgical Technique Using a Gillies Type Malar Elevator
Step 1: Identifying the Incision Site
A small incision, approximately 2–3 cm long, is made in the temporal region, just above the hairline and anterior to the ear. This placement hides the scar and provides direct access to the temporalis fascia.
Step 2: Dissection Through Tissue Layers
The incision is carried through:
- Skin
- Subcutaneous tissue
- Superficial temporal fascia
Blunt dissection is performed carefully to reach the deep temporal fascia. The goal is to create a plane that allows the elevator to slide smoothly toward the zygomatic arch.
Step 3: Insertion of the Gillies Malar Elevator
The Gillies type malar elevator is gently inserted beneath the deep temporal fascia, keeping close contact with the bone. The instrument is advanced inferiorly and anteriorly toward the depressed zygomatic arch or malar eminence.
Correct placement is critical. The elevator should lie beneath the fracture segment to allow effective elevation without soft tissue entrapment.
Step 4: Elevation and Reduction Manoeuvre
Once positioned, controlled upward and outward pressure is applied. A distinct “click” or palpable movement often indicates successful reduction. The surgeon may use the non-dominant hand to palpate the zygomatic contour externally to confirm realignment.
The manoeuvre may be repeated gently until satisfactory symmetry and contour are achieved.
Step 5: Confirmation of Reduction
Reduction is assessed by:
- Palpation of the zygomatic arch
- Restoration of facial symmetry
- Improved mouth opening
- Intraoperative imaging, if available
Ensuring adequate reduction at this stage minimises the need for secondary procedures.
Step 6: Closure
The elevator is withdrawn carefully, ensuring hemostasis. The incision is closed in layers, usually with a few sutures to the skin. A pressure dressing may be applied to reduce postoperative swelling.
Postoperative Care and Instructions
Postoperative management focuses on reducing oedema, maintaining the reduction, and monitoring for complications. Key aspects include:
- Analgesics and anti-inflammatory medications
- Prophylactic antibiotics as indicated
- Cold compresses for the first 48 hours
- Soft diet to minimise stress on the zygoma
Patients are advised to avoid pressure on the affected side and refrain from contact sports for several weeks.
Potential Complications
Although generally safe, the Gillies technique may be associated with:
- Incomplete reduction
- Relapse of fracture
- Hematoma formation
- Temporary facial nerve weakness
- Infection (rare)
Most complications can be avoided with proper technique, careful patient selection, and timely intervention.
Advantages of the Gillies Malar Elevator Technique
This method offers several clinical advantages:
- Minimal scarring
- Reduced operative time
- Cost-effectiveness
- Preservation of soft tissue and periosteum
For appropriately selected fractures, outcomes are comparable to more invasive open techniques, making it a valuable tool in maxillofacial trauma management.
Clinical Tips and Pearls
- Early intervention yields better outcomes
- Gentle, controlled force prevents overcorrection
- Always confirm the reduction clinically and radiologically
- Combine with other approaches if stability is questionable
Experience and familiarity with facial anatomy significantly enhance success rates when using a Gillies-type malar elevator.
Conclusion
The Gillies type malar elevator remains an indispensable instrument in the management of selected zygomatic fractures. Its minimally invasive nature, combined with reliable outcomes, makes it a preferred technique for closed reduction of depressed zygomatic injuries. By following a systematic, step-by-step approach—from patient selection and preoperative planning to precise surgical execution and postoperative care—clinicians can achieve excellent functional and aesthetic results. Mastery of this technique is an essential skill for anyone involved in maxillofacial trauma surgery.
Frequently Asked Questions (FAQs)
- Is the Gillies technique suitable for all zygomatic fractures?
No, it is best suited for non-comminuted, displaced fractures without orbital floor involvement.
- How long does the procedure usually take?
Typically, the procedure takes 20–40 minutes, depending on complexity.
- Is fixation required after Gillies’ reduction?
In many cases, no fixation is needed if the fracture is stable after reduction.
- When should surgery ideally be performed?
Within the first 7–10 days after injury, before fibrosis develops.
- What is the success rate of the Gillies approach?
When properly indicated and performed, success rates are high with good aesthetic outcomes.